Stylesheet is the abbreviation for CSS (Cascading Style Sheet). A stylesheet is a kind of template for HTML pages. The layout (background color, font type, text size,...) for all pages is specified in one template.
In order to create a stylesheet, proceed as follows:
|1| Choose "Interface" from the main menu by clicking on it.
|2| Now, click on the "modify"-button next to "Body design".
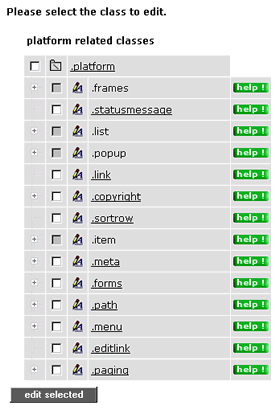
|3| A stylesheet consists of several elements called "classes". Below, you see all available classes in the simple mode.

Some classes have sub-classes. Click on the plus symbol left of the class label in order to display the sub-classes.
Classes next to a grey checkbox serve only as a heading. Changes can only be made in the classes lying underneath.

The help buttons tell you which elements can be changed in the individual classes. If you click on a help button, a pop-up window opens with all necessary information.
|4| Click on the title of a class in order to specify or change certain elements. If you want to edit more than one class at once, click in the checkboxes of the desired classes and click on "edit selected" at the bottom.

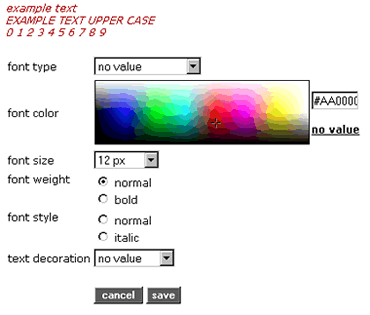
|5a| In classes, which refer to characters, you can make six different settings (font type, font color, font size, font weight, font style, text decoration). You can specify the font color by selecting it from the color overview table or by entering teh exact color value in the input field next to the color selection.
|5b| If you want to restore the original settings in the class, click on "reset class" at the bottom.
|6| Click on “save” to submit your settings.
If you want to restore the stylesheet for the entire platform, click on "reset css file" in the stylesheet interface start page.
For advanced users(advanced mode):
- you can "switch the manual CSS" via clicking on the link placed under the menu in the left side.
- you can also add styles and customize the fonts displayed in TinyMCE. You can manage this in advanced mode (the step described above) in section "custom editor-generated CSS" or by checking
 placed under the interface of the simple mode. placed under the interface of the simple mode.
- you can define additional styles for the Print layout by checking the
 placed under the interface of the simple mode. Use "!important" to override some styles, while printing. placed under the interface of the simple mode. Use "!important" to override some styles, while printing.
|

